Arguably the most complex addition by Railcraft is the concept of Signalling, but once you get the hang of it you won't stop to look back. Signals are powerful and give us the ability to route minecart traffic using advanced logic and wireless connections. This page will explain the basics of the Signalling and how to setup your own system.
Terms[]
We will start with a list of terms. To those of you familiar with railroads, you may recognize some of these terms:
Signal Block - The length of track between two paired Block Signals. Can be quite long, they can even extend beyond the chunk loading boundary. Currently you can only define straight sections of track as a Signal Block. Any deviations or breaks in the line between two signals will render the Signal Block invalid. Slopes are valid, but there are some considerations that need to be taken into account. More on that later.
Signal Aspect - Basically the current state of a Signal Block. Possible states in order of least restrictive to most restrictive are Green, Blink Yellow, Yellow, Blink Red, Red. Blink states are currently only used to indicate Signal Block pairing state (blinking red for unpaired and blinking yellow for pairing). Green indicates that no minecart is in the Signal Block. Yellow that the minecart is moving away from the Signal, and Red means that a minecart has either stopped in the block or is moving towards the signal.
Controller - A device capable of transmitting a Signal Aspect to a Receiver. All Block Signals function as Controllers.
Receiver - A device that can be paired to a Controller in order to trigger different behavior on different Signal Aspects. These would be Distant Signals (and the lower lamp on the Dual-Head Block Signal), Switch Motors, and Receiver Boxes.
Block Signal - A Signal that can paired with another Block Signal to define a Signal Block. It also functions as a Controller. They only function is pairs, and every 4 minutes check the validity of the Signal Block they define. In the case of a failure (track pieces removed), it will wait another 4 minutes before checking the Signal Block again. If the Signal Block is still invalid, the pairing will be cleared and they will revert to the Red Blink state.
Distant Signal - A Signal that functions as a Receiver to display the state of the paired Controller. This can be used to display the status of Block Signals you could not normally see, such as the status of a Diverging Line or the status of the Signal Block after the current one.
Main Line - The primary track, for our uses it will usually refer to a straight section of track.
Diverging Line - A track that splits from the main line and travels in a new direction.
Items[]
Now we will move onto the two items that are needed to create a functional Signal System. Both function by right-clicking on one block and moving to the block you wish to pair it with and right-clicking on it. It's a simple system to pair devices. You will receive various messages indicating the success or failure of any pairing attempt.
Signal Block Surveyor - This surveying tool is used to pair two Block Signals to create a Signal Block. It cannot be used to pair a Controller with a Receiver.
Signal Tuner - An electronic frequency scanner used to pair a Controller with a Receiver. Note that the Controller has to be selected first. Right-clicking on a Receiver withouth having first clicked on a Controller will clear its pairing. It cannot be used for pairing Block Signals.
Devices (Blocks)[]
And now we have the real meat of the Signalling System, the Signals and devices operated by them. Block Signal - The most basic Signal, both a Block Signal and a Controller. This signal will form the heart of your Signalling System. It must be placed near a rail in order to form a valid Signal Block. The exact distance it can be from the rail is somewhat hard to define, but it must be within two tiles horizontally, and four tiles vertically. You need not place the signal on both ends in the same configuration relative to the rail, all that matters is that the rail forms a straight line between the two signals. When searching for a rail, it will look below it first, then one tile to either side, and then finally two tiles to either side. If two rails are equidistant to the signal, the exact rail picked will vary on the implementation of the search algorithm and will not be defined here. Best to avoid such configurations as there is no guarantee they will remain valid between updates.
Locations of valid Block Signal placement:
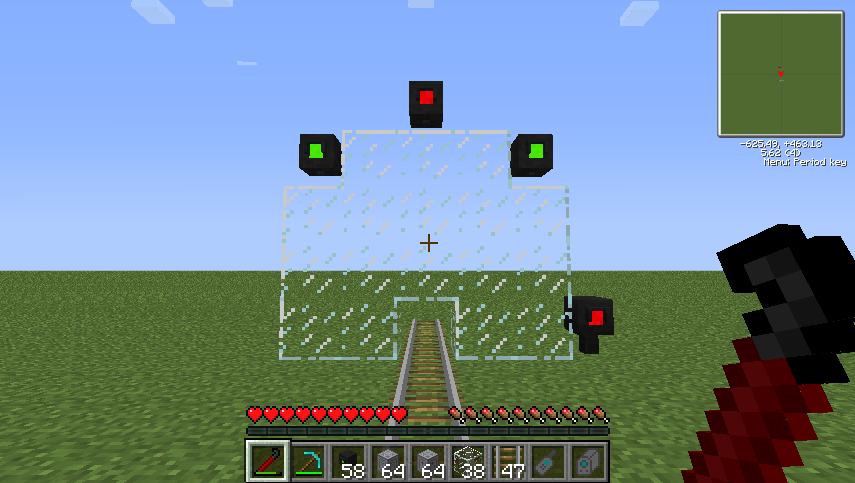

The glass indicates how far signal blocks can be placed relative to a track, including the green signals. The red ones are outside the boundary and won't detect the track.
Distant Signal - A simple Receiver that can be paired to a Controller. When paired it will display the same Aspect as the paired Controller. As stated before, this is used to display the aspect of another signal. Useful for indicating the status of the next Signal Block or a Diverging Line. Can also be used in Stations or CTC centers if you are creative.
Dual-Head Block Signal - Combining a Block Signal and a Distant Signal, it possess two lights. The top light is a Block Signal and can be paired with any other Block Signal and functions as the Controller. The bottom light is basically a Receiver that can be paired to any Controller.
Switch Motor - This block is placed across the main line from the diverging line (replacing the traditional lever) and switches a Switch Track when powered by either Redstone or a paired Controller. When unpowered the Main Line is capable of travelling in either direction without adjusting the switch. Here you can see a Switch Motor controlling a Switch Track as viewed from the diverging line. The four images show the powered and unpowered track in both orientations.
")
")
")
")
Signal Receiver Box - This box can be paired with any Controller. When paired, you can open a GUI to pick which Aspects should emit a Redstone current from the Box. If placed next to a Signal Controller Box it will transmit the Aspect to it as well. Remember, you can only pair a Receiver by right-clicking on a Controller Box first.
Signal Controller Box- This box can be placed next to a Signal Receiver Box and will then send the Signal Aspect from the Receiver Box to a paired Receiver. Multiple Controller Boxes can be placed next to a single Receiver Box. This enables a single Block Signal to control multiple Switch Motors or Distant Signals. Placing two Receiver Boxes next to a Controller Box will cause the Controller Box to send the most restricted Signal Aspect between the two. Additionally it can be powered via Redstone to emit an Aspect chosen via a GUI. It will not activate on the Redstone current emitted directly from a Signal Receiver Box. It will however always emit the most restrictive Aspect between the one chosen in the GUI and one received from a Receiver Box. (Source http://railcraft.wikispaces.com/Signalling+%28Guide%29)
Creating a Signal System[]
The most basic signalling system comprises of a straight section of track between two Block Signals. To create this, first place a Block Signal at either end a length of track within the boundaries described above. Block Signals do not have to be on the same side of the track. Once placed they will both flash red and continue to do so until they're paired by using the Signal Block Surveyor and right clicking on each Block Signal (the order they are clicked does not matter). Once successfully paired a message will display on screen indicating that the Signal Block has been created and, assuming there are no carts on the track sections between the two Signals, they will both change to solid green.
Below we have a pair of Block Signals already paired and indicating an empty Signal Block. For the purposes of explanation in the following items, we'll name the two Block Signals A and B, with A being on the left and B being on the right whilst viewing the length of track as shown above.


Signal Behaviour - A minecart entering into the Signal Block will change the Signal Aspect of the block and change the light colours displayed by the Block Signals. The trigger point (the point at which the cart triggers a change in the Signal Aspect) is slightly different for each signal. A minecart sat on the track directly infront of signal A triggers signal B and the trigger point for signal A appears to be approximately 1.5 blocks into the Signal Block, as shown in the following images...
")
")
")
The behavior of the signals varies depending on what the minecart is doing in the Signal Block. As a minecart enters the block from the left and passes signal A, signal B changes its colour to red (cart heading towards it) and remains red until the minecart passes signal B, at which point it will return to green. As the minecart continues through the block, signal A changes to yellow (cart heading away from it) and remains yellow until the minecart leaves the Signal Block, at which point it returns to green again. If the minecart slows to a stop inside the Signal Block, signal A will display red and will remain red until the cart is moved out of the block (either by it continuing its journey or by removing it manually. This behaviour is identical in the opposite direction just with the points reversed, so a cart passing point B heading to point A would change A's colour to red and B would turn to yellow etc.
For aesthetic purposes, Block Signals should face out of the Signal Block they govern so as to indicate the Signal Aspect to carts on the track heading towards block from either direction, however, the actual orientation of the Block Signal doesn't matter and successfully paired signals will function correctly regardless of their orientation. As an example, a minecart encountering a yellow signal at A knows that another minecart is already in the signal block but still moving away from it. A red signal being encountered would indicate that the minecart in the block is either heading in the same direction and has stopped inside or that a cart is heading towards it in the opposite direction. Similarly, a minecart approaching signal B from the right and observing a red light would know that the block is either occupied by a stationary cart or one heading towards it. A green signal being observed at either point indicates that the block is clear.
Basic Signal Systems[]
Basic signal systems can be created by combining components of Signalling, Track and Redstone to create function Minecraft varients of their real life counterparts. For example, block occupancy, sidings, stations and more. These will be covered in depth on the Basic Signalling page.

All items (10)


